In days gone by, people used to use file transfer protocol (FTP) to connect to their Web sites to copy files to and from their local computer. With the rise of SSL for secure connections between browsers and Web sites, good old FTP is no longer considered secure and most (responsible) hosting companies no longer offer it.
The good news is there is a secure replacement for FTP, simply called SFTP, which uses a secure shell (SSH) connection to ensure all data is encrypted when transferring files. SFTP is not as straightforward to setup as FTP, but once you’re there you can use a GUI client to easily shuffle files to your WordPress site. In this blog we will take a look at how to setup SFTP, from generating the keys to transferring files.
Step 1: Generate your SSH keys
To use SFTP you need to have a set of keys. Digital keys combine to form a “match” to authenticate two machines and distinguish from imposters. We say “keys” because there is a private-public pair. Think of the difference this way:
- A private key: The key that is unique to you and not shared with anyone. This is like a car or house key on your keyring.
- A public key: The lock that is out in the open, but will only work with one key. This is like the lock on a car or a chain – it can be accessed by anyone, but you still need a private key to unlock it.
By generating a pair of keys you will have a secure way of encrypting file transfers between you and your host. When generating a key pair you will be doing the following, with slight variations depending on the client software:
- Name the keys: Give the keys an easy to digest name such as “WPQuasar restaurant site”.
- Select a key type: The ECDSA algorithm is currently considered the most secure.
- Set the encryption strength: A 521-bit ECC curve is recommended.
- Set a password: As an added layer of security each key pair will have a password that apps can ask for before using the key. Pick a password for your key and keep it secure.
- Save your keys: Once generated, save your new public and private keys and keep them save.
Windows
On Windows you can use a free software package like Putty to generate a set of keys.
First, download the package from here: https://www.chiark.greenend.org.uk/~sgtatham/putty/latest.html
Then install it using by double clicking the Windows installer file. To generate a set of keys you will need to download puttygen.exe, which can be found here: https://www.chiark.greenend.org.uk/~sgtatham/putty/latest.html
Open puttygen.exe. Select ECDSA as the type of key to generate, and nistp521 as the Curve. Generate the key. The public key (at the top the dialog box) can be sent to the hosting provider. Add a passphrase and save the private key – you will use this key to authenticate SFTP.
Mac OS & Linux
Mac OS X and Linux ship with OpenSSH which can generate a key pair from the command line.
Run the command:
ssh-keygen -t ecdsa -b 521
You will be prompted to enter a location to save the private key. Choose a location (e.g. /home/user/ssh) and the public key will be saved in that location as well. Next, type in a new password at the prompt. This password will be used to protect your private key if it is leaked or stolen.
Chrome OS & Web options
If you are unable to generate a key pair from a local machine, such as Chrome OS, all is not lost as you can try a Web application to generate them.
Services like JS Encrypt (https://travistidwell.com/jsencrypt/demo/) will generate a key pair you can download and use on any machine.
Android
On Android there are a number of SSH clients such as JuiceSSH and Termux that will allow you to generate SSH keys.
iOS
As with Android, there are apps for iOS, such as ish.app, which allow you to generate a ssh key pair.
Step 2: Send the public key to your hosting provider
With your freshly minted keys ready to use, it’s time to send the public key to your WordPress hosting provider.
You can do this via email or with a web application. You public key will be saved in the provider’s authorised keys file allowing you to connect to your WordPress files folder securely. Remember, keep your private key private and don’t sent it to anyone or misplace it.
Step 3: Install and configure an SFTP client
With all the groundwork done, it’s time to fire up your favourite FTP client. So long as the client supports SFTP then the user experience will be essentially the same.
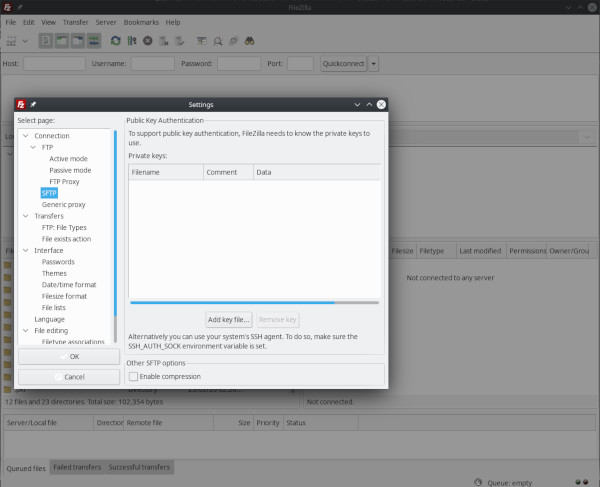
Filezilla
FileZilla is a great, free FTP and SFTP client for Windows, Linux and MacOS. To perform key-based authentication, navigate to Edit -> Settings and you will see the SFTP settings. Add your private key and you will be able to connect to the server which has your public key.
SFTP commands
Most Unix-like operating systems generally support the sftp command from the terminal, but how to use that is the topic of another blog.
If you’re confident using sftp on a command line, you probably don’t need too much guidance anyway.

